Friday, May 15, 2009

6th grade Greek Masks


Sixth grade is learning paper mache techniques through making Greek Masks. We talked about the Greek Theatre, and the difficulty of reaching out to thousands of people in a performance. Without speakers and microphones, how does the audience know what is going on? The answer is in the masks. The mouths form tiny megaphones that amplify the sound. On the front of the masks, symbols tell the audience who the character is, so they never need to worry about heros vrs. evil-doers.
After studying the proportions of the face, students worked on created exaggerated expressions on their masks. They used paper pulp and paper mache strips to form cheek bones, chins and forheads that stick out. They looked at the lines muscles made when people frowned and the swinty eyes that form when cheeks push up into the eye socket space.
After designing their masks, they decorated them with tissue paper and paint for skin color and an assortment of feathers, beads, cloth and yarn for hair and additional decorations.

Subtractive Sculpture


Our last big project of the year is plaster carving. Plaster is our form of imitation rock. Rock is hard to carve and takes a long time. Plaster is a little easier, but still takes a great deal of patience before you can see the image your imagined.
Students begin by making a solid plaster form. Some have decided to go organic, and have poured plaster into a baggie and allowed it to dry into an amorphic shape. Others have poured plaster into cups, creating blocks of plaster similar to blocks of stone that would be bought from quarries
Student are using plastic knives to carve the plaster. But in order to do this, they must keep the plaster somewhat wet. We spritz the plaster with water to make the carving easier, and keep them in sealed plastic bags so the moisture doesn't escape.
They must design their carvings carefully. If a part is too thin, it will break off. Arms must be connected to the bodies and thin legs cannot hold a heavy sculpture. They need to think of how they can compact a sculpture so that it can be carved easily from one solid form. For example, making a sleeping cat curled up is much easier than trying to carve a cat standing on four legs.
Sculptures can be polished to a high shine with butchers wax, or made shiny by rubbing layers of milk into the plaster with a rag.

Thursday, April 16, 2009

Guest Bloggers : Zach F. and Ray C.

In art last year I made a really cool clay sculpture. It was a picture of Jason I got off the computer and I traced it onto a piece of clay. After that I cut it out with clay tools and I formed texture on how it would feel in real life. It was a really fun project and I would like to do it again. After all, the project turned out great and it went to the art show.--Zach

This year I drew an abstract art in class. I was very proud of it. It got put in the art show. I don't know how I got the idea of it but I did. It was a picture of a flat landscape and a really cool abstract moutain range. The sky, ground, mountain and sun all blended in making it look good. I was very proud.

Saturday, April 11, 2009

Check this out: Sculpture faces out of Toilet Rolls

www.loudreams.com/2009/04/06/toilet-paper-roll-sculptures


Greek Pots: Black Figure and Red Figure drawing


The sixth grade students are looking at Greek art and natural figures. They have looked at how pots are made in an earlier unit. Now they are seeing how glazes made a big difference in the art world. With only one color glaze, Greeks made black figure and red figure pottery, and were able to create epic stories on the contours of their pottery. 
Students experimented with working with these methods by creating an oil pastel pot, and drawing over it with another oil pastel, as if it were the glaze. Black figure drawings started with silhouettes of figures drawn in "glaze". They scratched through the glaze with scratchboard tools to create details in their black figure designs.
Red figure designs created details by drawing into their figures with the glaze, and filling in the negative space on their pot compositions with glaze.


Sculpture: George Segal and plaster wrap bandages

We are all familiar with the plaster wrap bandages that are used when someone breaks an arm or a leg. George Segal uses this material to capture the human form exactly.  

George Segal made his first artwork from plaster soaked bandages in 1960.  His work began by covering parts of a body, then plastering the body parts together until they formed an entire person. His work is displayed as unpainted plaster forms, monochromatically painted forms and cast in bronze. 

Sculpture students at Parker have used George Segal's style to make plaster hands. Their assignment was to create a message with the hand, by painting and/or adding other media to that sculpture. 

Some have become hands of friendship or peace, others have transformed into animals, flags and robots. All have found personal statements can be made with the small gestures of a hand.

Donate to Food Banks by making Computer Art


You can donate $1 to Feeding America by making computer art.
Go to breadartproject.com and you will find a museum of toasted bread art. Go to the workshop and make your own art for display in their gallery. For every piece of art you make, they will give $1 to Feeding America. Then go to the galleries and look at what other artists have done with their toasted masterpieces.

Wednesday, March 11, 2009

Abstract Sculptures


With wire and nylon stockings, we've made abstract sculptures that take on odd mysterious forms. Students first bent wire and coathangers into many angles. They drilled wallboard for a base, and glued the wires into the wallboard. By taking a nylon stocking and covering the wires, wrapping the stocking all the way around the base, they have created new and unusual forms.
THE ASSIGNMENT: First, find an image in this form. It can be a wave, a squirrel, a face, a tree, etc. Then make your viewers see that image clearly by painting and adding items to the scupture, until it is recognizable.
SCULPTURE IS ABOUT COMMUNICATION. How can you manipulate an abstract image, into a concrete idea? What do you want the viewer to go away with?

7th grade art history Research


For those of you who are having a hard time getting all the information for your web quests, you can finish these projects at home.
Just go to edline, to your art classroom and click on the link on the right hand side of the page.
For Hudson River groups, click the hudson river quest.
For all others, click on web quest.
All students will be given a group grade, an individual grade on research and an individual grade for their landscape drawing or painting.

Thursday, February 12, 2009

Congratulations!!!!!!! Scholastic Art Winners


2009 Scholastic Art Awards Winners!!
Parker students win 5 Art Awards!
We are pleased to announce that four Parker students won five Boston Globe Scholastic Art Awards in this year's contest! They are:
Julia Dudley-Kramer: Gold Key Award and Silver Key Award
An Le: Silver Key Award
Emily O'Sullivan: Honorable Mention
Sarah Parker: Honorable Mention
This is a very prestigious contest for students and we are very proud of each student who entered this year. Congratulations!

Murals Murals Murals in 8th Grade Art Studio


The mural bug has bit our 8th grade art studio students. We have a large variety of murals in progress around our school. We have recently finished some murals in the boy's locker room, and are designing ones for the girl's locker room. We have one pointing to the library, and designs that trickle down the stairwell from the eighth grade hall.
8th grade art studio works on a contract basis, creating a portfolio of work they design and impliment throughout the year. At the end of the year, each student will go home with a portfolio of their work, as well as short essays on subjects such as what makes a good artist, what are the best art materials, and who do I admire as an artist.

7th Grade Figures Class


7th grade figure class has been looking at movement and proportion in figures. We worked with gesture drawings, looking at how legs and arms bend, how backs twist and how feet support the body, and tried to make our figures in proportion by making the bodies 6-8 heads tall. Using wire armatures, we created figures in mid-action. Characters are in the middle of a leap, catching a ball, dancing or skiing off a ski jump. Each of these characters are in the air, and so we will display them by hanging them from a string or using wire to balance them in the air, above a base or a stand.
Using paper towels for the body, we are covering them with tissue paper skin and using cloth and twisted paper for clothing.

6th grade Art Studio Weaving


Making cloth is long and hard. No wonder children in the colonial age only had one or two outfits to wear. We couldn't imagine having only one pair of jeans and a T-shirt. But students in the art studio class can. They understand how long it takes to weave, and how hard it is to put a design into that weave.
Students have been working with cardboard looms, practicing simple weaving, and then working with needles to weave designs or letters into their cloth. Their final project is to make a clay wall hanging, where their weave is an intricate part of the art. They will use found objects such as feathers and sticks as well as yarn to create this interesting woven effect.

It's all about Balance


Sculpture students are learning how balance effects what they make.
We've all had Christmas trees in our lives that weren't balanced. Sometimes we tied them up, or tacked parts to the wall to create a better balance. But sculpture artists must make a piece of art that will balance on its own.
We started this unit by looking at the king of balance, Alexander Calder, who invented the mobile. He could take any tiny thing and make a balanced and most often, moving sculpture from it. Students learned about asymmetrical, symmetrical and radial balance, then practiced these in sculpture form. By puttting their first sculpture on a wire, they not only needed to balance it successfully, but needed to consider where the center of gravity was, how to increase the strength of the wire for heavier sculptures and how to create an interesting piece that would attract a viewer's attention.
Their second sculpture is an asymmetrical mobile, hanging from the ceiling or sitting as a table-top mobile. Calder made many humorous sculptures (a seal balancing balls, leaves blowing in the wind, a juggler) in his mobiles so that they had a theme as well as colorful balance. Our students must also have a theme to connect the ides of their sculpture. Some of our student's themes are space, growing flowers, monsters and arrows.

7th grade Art History through Landscapes


7th grade is looking at five styles of art from 1800 through 1950. By looking at these art styles, they are able to see how art changes as a reaction to what has come before it, and also as a reaction to the political and historical times it is created in.
Students will examine an art style closest to their own by completing a web quest. They will discover the rules of their style of art, and see how it fits into the political and historical surroundings of the time. They will work with their small groups to create a powerpoint or a podcast to present to the class. And they will finish their study by creating a landscape that uses the rules of their chosen style, but is an original work of art.
Students are beginning this unit by reading paintings to discover clues that will tell them about the art style and the time period it was made in. They are seeing how perspective rules help to create the illusion of space, and will follow up with lessons on one and two point perspective.

Egyptian Parody in 6th Grade


A parody is a work that imitates the characteristic style of another work, either for comic effect or ridicule.
In the 6th grade, we are working on Egyptian parodies. But you can't make a parody until you understand what you are making fun of. We are learning some of the most dramatic rules of drawing Egyptian art. Using at least five of those rules, we will be making modern ideas, drawn in traditional Egyptian style. Imagine an Egyptian skiing down a pyramid, or going to a mall, or an Egyptian rock star. By putting modern images into a painting that follows the old Egyptian drawing rules, we not only learn about the art, but transform it into a parody.
Some of the rules we are learning are:
How to draw people: face in profile, shoulders front, legs and arms in profile, eye facing front
Borders: geometric over organic
Perspective: Profile, Bird's Eye View, Frontalism, Mixed perspective
Stacking: one on top of another
Standards: like comic strip formats
Size Changes: the more powerful the person, the bigger they are
Horror Vacui: fear of empty spaces

Thursday, January 15, 2009

Sculpture in the Round


6th graders have learned about Mesopotamian relief sculptures. In Relief, one side is always flat and the other is raised up 3 dimentionally. In sculpture in the round, sculptures must be interesting from all sides. Most students think of things as looking at them from the front. It is a real challenge to make the back as interesting as the front.

Students are working on sculptures similar to that in Mesopotamia, working with good luck charms, on heroes or bravery and on warnings or narratives. After choosing one of the themes, they create a sculpture that uses horizontal lines (feels orderly, organized or soldierly) horizontal lines (peaceful and quiet) or diagonal lines (action) to help get their concepts to read to the viewers.

Of Teapots and Tea parties


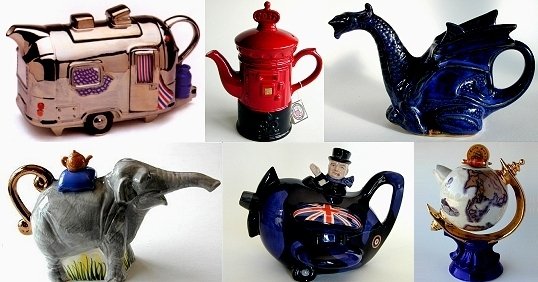
How else to end a clay class, but to combine all we have worked on and make a teapot?
Teapots can be made from coils, slabs or pinchpots. We learned how to make lids that stay on by constructing boxes. We learned how to make spouts by rolling out slabs. Students finished their classes by making teapots that combined all their skills into one form. This week we are having a tea party to end the semester with. Students will be able to drink from their teapots (those that are finished)or cups, and share a snack while we wrap up our ceramics to go home.

A quick reminder. Clay pots do not go on a stove. Instead, they are to hold hot water. They also get very hot in the mircrowave, so it is not recommended. However, they do pretty well in the dishwashers, and can be washed that way.
Good bye 8th graders. Have a great next semester